

Certificate-Based Authentication (CBA) in Microsoft Entra ID isn’t new. It has been quietly available for years, and it remains one of the least adopted features in the identity stack. That used to be understandable: certificates felt like legacy, passkeys were the shiny new thing, and most organizations had bigger fires to put out.
That calculation has changed. With the recent rollout of system-preferred authentication for the first factor, Microsoft now ranks authentication methods and automatically prompts users with the strongest credential they have registered. The ranking puts CBA right behind Temporary Access Pass and passkeys, ahead of Authenticator, TOTP, and (way down the list) passwords. In other words: if a user has a certificate, Entra ID will actively push them toward using it. CBA is no longer under the radar by accident. Microsoft is putting it front and center.
Time to take another look. Especially because one of the most persistent myths about CBA is simply wrong: you do not need a premium license for it.
🧠 Why Consider CBA Now?
If you are already deep into Conditional Access, passwordless strategies, or phishing-resistant MFA rollouts, CBA might be the missing piece:
- 🔒 Phishing-resistant authentication based on X.509 certificates, no passwords involved
- 🧾 Smartcard and PIV support for regulated industries, YubiKeys work out of the box
- 🌐 Cloud-native: no ADFS, no federation, users authenticate directly against Entra ID
- 💸 No additional license required: CBA itself is included in every Entra ID edition. Enforcing it through Conditional Access and Authentication Strengths requires P1, but if you’re reading this blog, you almost certainly have that already.
That last point deserves a closer look, because I keep seeing “requires Entra ID P1/P2” in blog posts. The Microsoft FAQ is explicit: CBA is a free feature, available in every edition. What does require P1 is Conditional Access, and with it Authentication Strengths, so any policy that says “require phishing-resistant MFA for this app” needs P1. The same goes for the bulk PKI upload in the trust store (individual CA uploads work on the free tier). In practice: the authentication method adds zero license cost on top of what most organizations already own.
🚨 First Things First: Get Off the Classic Trust Store
Before we even talk about setup: if your tenant still has certificate authorities configured under Security > Certificate authorities (classic), migrate to the new PKI-based trust store first.
I keep running into this in customer environments. The CAs were uploaded years ago via the classic experience, CBA “somehow works”, and nobody has touched the configuration since. I can confirm from several projects that the classic store causes real problems, and troubleshooting them is frustrating because the configuration looks perfectly fine at first glance.
Microsoft is pushing the migration too: the portal shows a prominent banner recommending the move to the new Entra Public Key Infrastructure capability, and the “(classic)” suffix in the blade name tells you everything about where this is heading.
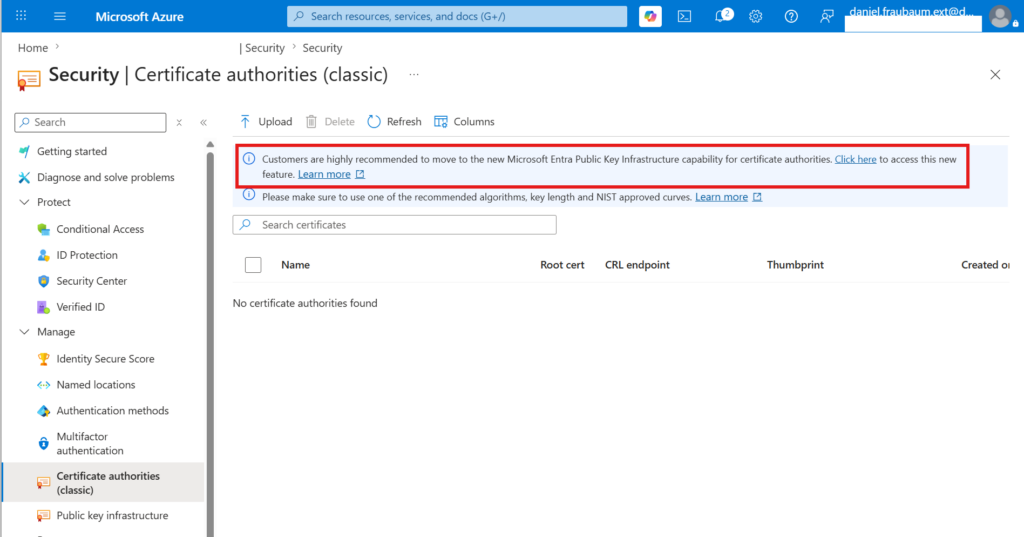
The new PKI-based trust store is where all current and future CBA capabilities live, including proper CA management and the CA scoping feature covered later in this post. The migration itself is straightforward: create a PKI object in the new experience, add your CAs there (individually, or via bulk PKI upload if you have P1/P2), validate with Test-MsIdCBATrustStoreConfiguration, and then remove the entries from the classic store once you’ve confirmed sign-ins work against the new configuration.
If you take only one thing away from this post before reading on: check your tenant now. If you see “(classic)”, put the migration on your roadmap for this quarter, not “someday”.
⚙️ How It Actually Works
Before jumping into the setup, it helps to understand the two policy layers that make or break a CBA deployment. Most quick-start guides skip this, and it’s exactly where deployments go sideways.
🔗 Username Binding: Which User Does This Certificate Belong To?
The username binding maps a field from the certificate to an attribute on the user object. Typical mappings are PrincipalName or RFC822Name from the SAN to userPrincipalName, or (better) certificate identifiers like the Subject Key Identifier or SHA1 public key hash to the certificateUserIds attribute.
This is where the concept of affinity comes in:
- Low-affinity bindings (PrincipalName, RFC822Name) rely on mutable, human-readable values. If an attacker can influence what ends up in a certificate SAN, or if UPNs get reused, you have a problem.
- High-affinity bindings (SKI, SHA1PublicKey) tie authentication to a specific certificate, not just a name that happens to match.
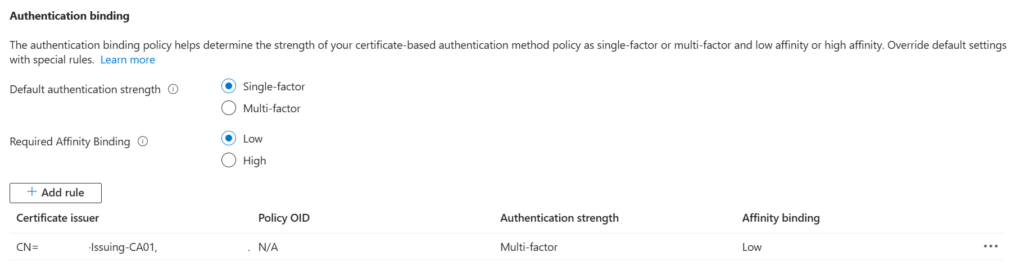
Microsoft’s own guidance is clear: use high-affinity bindings exclusively if you want real assurance that only a specific certificate can authenticate a specific user. For most greenfield deployments, populating certificateUserIds (manually, via Graph, or through your provisioning pipeline) is the way to go. You can even enforce this tenant-wide: the Required Affinity Binding setting in the authentication binding policy rejects any low-affinity sign-in outright.

A typical transition state: legacy low-affinity bindings still in place, with the high-affinity SKI binding to CertificateUserIDs as the target configuration.
💪 Authentication Binding: Is This Certificate Single-Factor or MFA?
The second layer decides how strong a certificate-based sign-in is. By default, CBA counts as single-factor. Through authentication binding rules you can promote certificates to multifactor strength based on the issuer or a policy OID in the certificate.
This matters because it’s the mechanism that lets your Conditional Access policies treat a smartcard sign-in as phishing-resistant MFA. A common pattern: certificates issued from your smartcard CA (private key on hardware, PIN-protected) get promoted to MFA, while software certificates stay single-factor. You can even reference issuer and policy OID combinations in custom Authentication Strengths for fine-grained control over which certificates unlock which resources.
And if a certificate only satisfies a single factor but the policy demands MFA? Entra ID offers registered second factors like FIDO2 or passwordless phone sign-in on top. Single-factor CBA plus FIDO2 is a supported combination to reach MFA.
🛠️ Setting It Up
1️⃣ Issue and Deploy Certificates
Each user needs a client authentication certificate that:
- Contains an identifier you can bind to the user (UPN in the SAN for low affinity, or plan for certificateUserIds with high-affinity bindings)
- Is issued by a CA you will trust in the tenant
- Lands on their device via Intune (PKCS or SCEP), GPO, or smartcard provisioning
User certificates only. Device certificates play no role in Entra CBA.
2️⃣ Upload Your CA Certificates
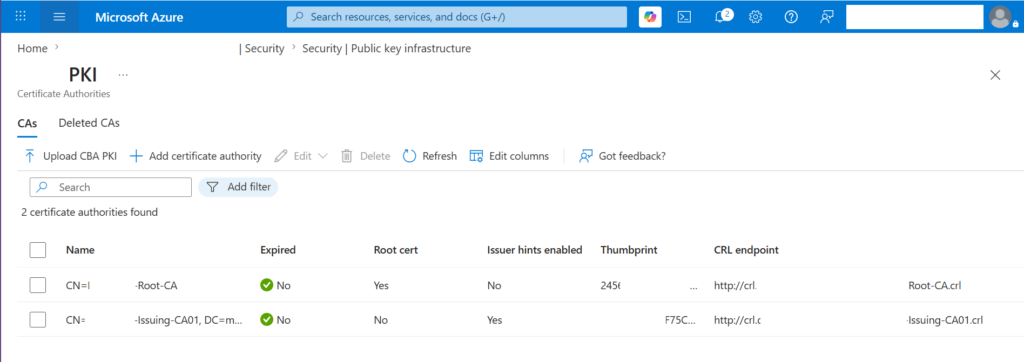
In the Entra admin center, configure the PKI-based trust store (not the classic Certificate authorities blade, see above) and upload your root and issuing CA certificates. Two things to get right here:
- Set the CRL Distribution Point URL for each CA
- Validate the chain afterwards
The MSIdentity Tools PowerShell module ships a cmdlet exactly for this: Test-MsIdCBATrustStoreConfiguration reviews your tenant’s CA configuration and flags common misconfigurations before your users do.
3️⃣ Configure Username and Authentication Bindings
Covered above. Decide on your affinity strategy first, then configure the bindings. Changing this later with users already onboarded is unpleasant.
4️⃣ Enable CBA and Wire It Into Conditional Access
- Under Protection > Authentication methods > Policies, enable Certificate-based authentication for your target group
- Create a custom Authentication Strength that includes CBA (or use the built-in Phishing-resistant MFA strength, which covers multifactor CBA alongside passkeys and WHfB)
- Create a Conditional Access policy targeting your pilot group with “Require authentication strength” as the grant control
✅ This is how you require certificate authentication for sensitive apps instead of just offering it.
5️⃣ Pilot, Then Roll Out
Start small. Verify the certificate picker shows up, the right certificate is selected, the sign-in logs show the expected authentication strength, and your Conditional Access policies evaluate the way you designed them.
⚠️ Gotchas You Should Know Before Going Live
This is the section I wish someone had written before my first CBA project.
🧯 The CRL silent fail. Entra ID supports exactly one CRL Distribution Point per CA, HTTP URLs only. No OCSP, no LDAP. And here’s the kicker: if you don’t configure a CRL for a trusted CA, Entra ID performs no revocation checking at all. Authentication is not blocked, revocation simply doesn’t work. A revoked certificate keeps signing in until it expires. Make CRL configuration and internet reachability a hard requirement in your design, and monitor it. The good news: you can now flip this behavior. The “Require CRL validation” option (CRL fail safe) makes CBA authentication fail if the issuing CA has no CRL configured, with an exemption list for CAs that legitimately don’t need one. Turn it on.
🏰 Your PKI is now a tier 0 asset. Any CA you trust in the tenant can authenticate any user in scope. If the PKI is compromised, an attacker can mint certificates for arbitrary users, including synced ones. If you run multiple PKIs or B2B scenarios, look at CA scoping (more on that below) to limit the blast radius.
🔑 Passwords don’t disappear. You cannot disable password as an authentication method. The password option remains visible on the sign-in page even when CBA is available. Enforcement happens through Conditional Access and Authentication Strengths, not by removing the password field. Set expectations accordingly, especially with security teams expecting a “passwordless switch.”
🪟 Windows Hello for Business certificates are only half-compatible. WHfB certificates work with CBA in Edge and Chrome, but not in non-browser scenarios like the Office desktop apps. Users should use the native Windows Hello sign-in option there instead.
⏳ Policy caching. Changes to the CBA policy can take up to an hour to apply. Don’t troubleshoot a “broken” config five minutes after saving it.
🚀 CBA Capabilities You Might Have Missed
Beyond the basics, CBA has picked up several capabilities over the last couple of years that are worth knowing:
- CA scoping: You can now restrict specific CAs to defined user groups. In multi-PKI environments or B2B scenarios this prevents a certificate from CA “A” from authenticating users who should only ever use CA “B”. Long overdue and very welcome.
- Issuer Hints: The certificate picker shows only certificates that are actually valid for your organization. Anyone who has watched a user stare at a picker with six certificates knows why this matters.
- CBA on iOS, finally usable: CBA on iOS existed for a while, but known issues kept it disabled as a second factor and at the bottom of the system-preferred MFA list. Those issues are fixed: native iOS sign-ins skip unnecessary password and MFA prompts, and CBA now ranks third in the system-preferred MFA hierarchy.
- System-preferred authentication at first factor: As mentioned in the intro, users with CBA registered are now steered toward it automatically. Your adoption curve just got a tailwind from Microsoft itself.
🤔 CBA or Passkeys?
Fair question, since both are phishing-resistant and both rank near the top of the method hierarchy. My take:
Passkeys are the default answer for most cloud-first organizations: simpler lifecycle, no PKI to operate, great UX. CBA wins when you already run a PKI, when smartcards or PIV are mandated (government, defense, regulated industries), or when certificate lifecycle management is an established process anyway. The two also coexist nicely: CBA for the smartcard population, passkeys for everyone else, both satisfied by the same phishing-resistant Authentication Strength.
🏁 Final Thoughts
CBA isn’t the newest kid on the block, but it has matured into one of the cleanest ways to get phishing-resistant authentication into environments where certificates are already a way of life. The setup is manageable, the license cost is zero, and with system-preferred authentication Microsoft is now actively surfacing it to users.
Just respect the sharp edges: high-affinity bindings, a reachable CRL, and a PKI you’d trust with your tenant. Because that’s exactly what you’re doing.
Leave a Reply