

Autopilot device preparation has carried one structural weakness since day one: it had no idea which tenant a device belonged to until a user signed in. Policies went to user groups only. OOBE screens could not be customized. Device naming happened after enrollment, not before. Device association closes exactly that gap by binding a physical Windows device to your tenant before enrollment, with a tenant affinity marker written into the device’s UEFI firmware and verified through TPM-backed attestation.
It is a real change to the trust model. It is also more manual than what you are used to from classic Autopilot, and both halves of that sentence matter before you plan a rollout around it.
🔗 What device association actually does
Device association establishes a verifiable link between a physical device and your tenant. The UEFI marker makes the device recognizable and authenticatable by the MDM provider before enrollment begins. Because Windows knows the tenant at OOBE time, it can apply organizational settings on screens that previously ran with no tenant context at all.
There are three lifecycle operations:
| Operation | Performed by | What happens |
|---|---|---|
| Pre-associate | Admin in Intune | The intent to create a TPM-backed association is stored in a central service, before anything is written to UEFI. |
| Associate | Automatic on network connect in OOBE, or triggered manually by a technician | The device’s TPM-backed identity is verified against what was pre-registered, then the UEFI marker is written. |
| Remove association | Admin, OEM vendor or partner, via PowerShell on the device | The UEFI marker is deleted and the tenant affiliation is cleared. |
The TPM part is what makes this interesting. Association is not a lookup table entry. The device has to prove it is the device that was pre-associated.
⚙️ The workflow
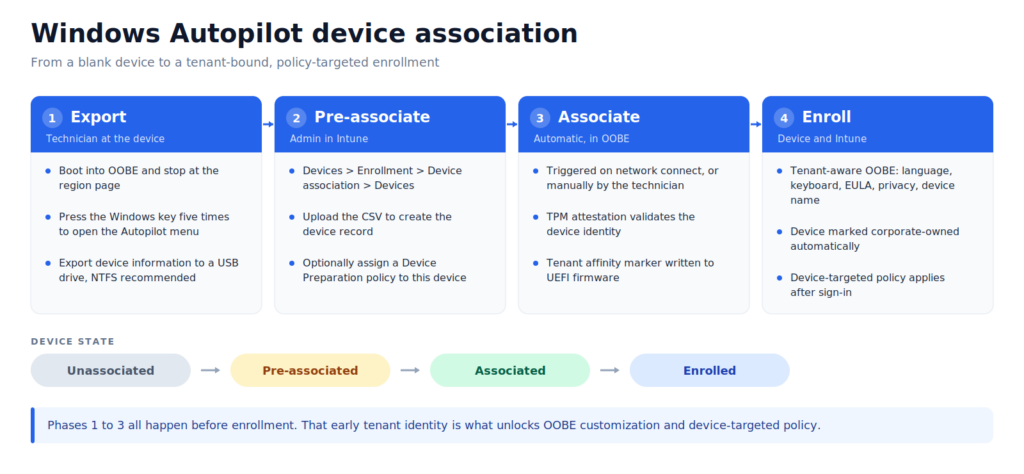
The four phases, and where the device state changes along the way.
One thing up front, because it is easy to mistake for step one: creating the device preparation policy is not part of the per-device flow. You build it once with your apps, scripts, deployment settings, OOBE experience section and optionally a device name template, and from then on it is just something you assign. The four phases below are what actually happens to each individual device.
Phase 1: Export
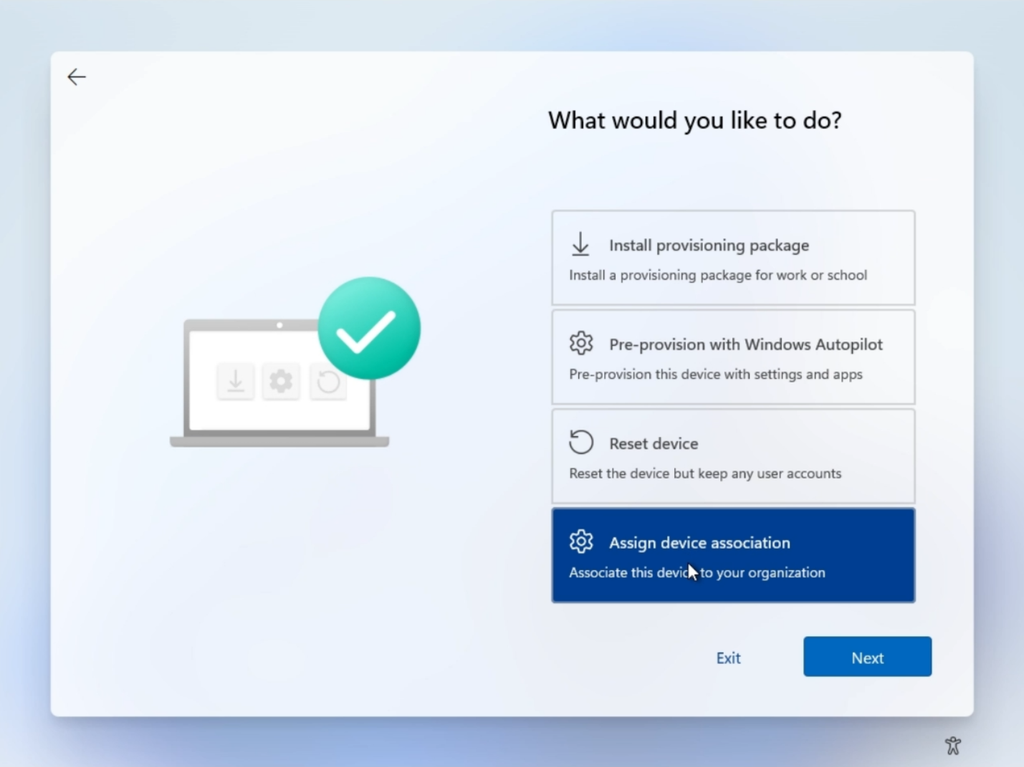
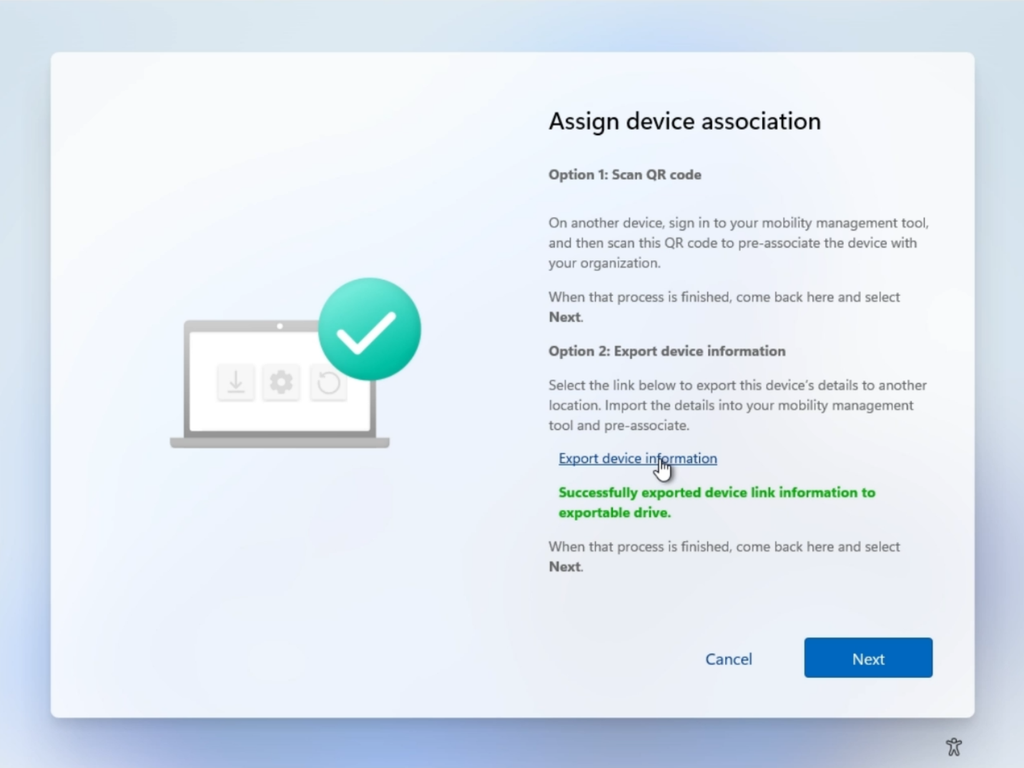
Turn the device on and boot into OOBE, then stop at the region selection page. Do not click through. From there, press the Windows key five times in quick succession and the Autopilot menu opens. Select Export device information, plug in a USB drive (NTFS is recommended), and select it again to write the CSV.
The menu also offers a Scan QR code option, but Intune currently only accepts the CSV from the export path. The QR route is there for anyone building a custom app that pre-associates devices through Microsoft Graph, which is the more interesting long-term option if you are staging at volume.
Phase 2: Pre-associate
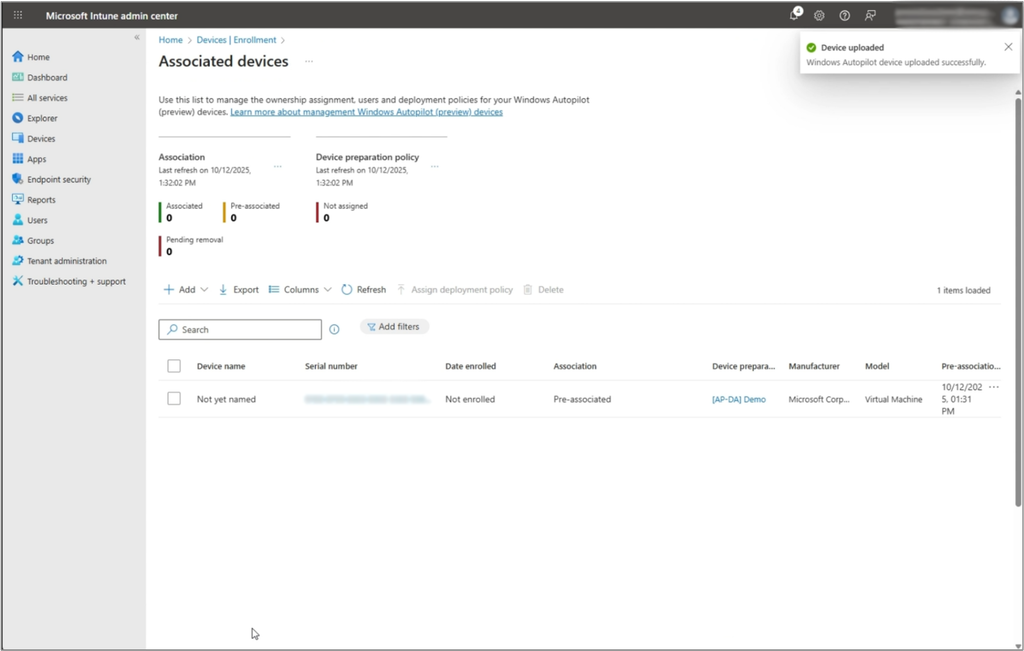
In the Intune admin center, go to Devices > Enrollment > Device association > Devices and select Add. Upload the CSV, then optionally pick a device preparation policy to assign to this specific device. If you skip the policy assignment here, the device falls back to whatever policy is assigned to the user who signs in during enrollment, and if that user has none, no device preparation policy applies at all.
One device per CSV file, so no bulk import today. The device now shows up with an association state of Pre-associated, but nothing has been written to the hardware yet.
Phase 3: Associate
This happens automatically once the device connects to a network in OOBE. To trigger it manually instead, return to the Autopilot menu on the device and select Next after pre-associating. The device contacts the Autopilot service, finds the pre-association record, and if it matches, the OOBE screen reports that association is complete. TPM attestation validates that the device really is the one that was pre-associated, and only then does the tenant affinity marker get written to UEFI.
The Device association list in Intune knows three states, and it is worth learning them before you start troubleshooting:
| State | Meaning |
|---|---|
| Pre-associated | Added via CSV, still waiting to complete association in OOBE. |
| Associated | The OOBE association step completed. Ready for enrollment. |
| Pending removal | A remove-association request was submitted and is being processed. |
Phase 4: Enroll
The tenant-aware OOBE customizations apply, the device is marked corporate-owned automatically, and after sign-in it picks up the device-targeted policy and continues into the regular device preparation deployment. When the device eventually leaves your tenant for good, you remove the association again, and that part is less pleasant than it sounds.
🖥️ What you finally get in OOBE
This is the part device preparation simply could not do before. The following settings become available in the user-driven device preparation policy and apply before enrollment:
- Language (Region)
- Automatically configure keyboard, skipping the keyboard selection page
- Hide Microsoft Software License Terms, skipping the EULA page
- Hide privacy settings, which also disables location services by default
- Hide change account options on the sign-in and domain error pages, requires company branding in Entra ID
- Apply device name template, up to 63 characters, letters, numbers and hyphens, not numbers only, with
%SERIAL%and%RAND:x%
Two things worth knowing. On Windows Professional editions, the Personal account / Work and school account page is hidden by default for all associated devices. And if the device connects over Wi-Fi during OOBE, the language and keyboard selection screens are not hidden. That second one will produce helpdesk tickets if you promise a fully silent OOBE without first checking how the staging network is wired.
🎯 Device-targeted policy assignment
Device preparation policies have always been assigned to user groups. One user with three devices got the same policy three times. With association you can assign a policy directly to a pre-associated device, so the correct one applies regardless of who signs in. For anything involving a shared technician account, or a mixed fleet of standard notebooks, shopfloor devices and kiosks staged by the same person, this is the difference between “works” and “does not work”.
You also get automatic corporate marking. Associated devices are flagged corporate-owned, so they are not blocked by personal device enrollment restrictions and you no longer need to upload corporate identifiers separately.
📋 Requirements
- Physical device only. Virtual machines are not supported.
- TPM 2.0, enabled and healthy, not in Reduced Functionality Mode. TPM attestation is enforced during association.
- Windows 11 24H2 or 25H2 with KB5120998 or later.
- Supported editions: Pro, Pro Education, Pro for Workstations, Enterprise, Education, Enterprise LTSC.
If you were planning to test this in a Hyper-V VM this afternoon, you were not.
⚠️ Limitations worth planning around
Removing an association from Intune is not supported. You clear it on the device by running a PowerShell script. For RMA, resale, decommissioning or a tenant migration, that means your offboarding process needs a physical step. Build it into your device lifecycle documentation now rather than discovering it during the first hardware return.
Windows 365 is out of scope, because Cloud PCs are already treated as trusted corporate devices.
⚖️ Is it actually better?
That depends entirely on what you compare it to.
Against classic Autopilot with vendor registration, it is worse on effort. There is no OEM or reseller channel for the DeviceLink CSV. Somebody has to boot each device into OOBE, export to USB, and upload. The “notebook ships from the distributor straight to the employee’s home office” scenario does not work here, and the OOBE export menu is not something you walk an end user through over the phone.
Against the classic hardware hash on trust, it is better, and not marginally. The Autopilot hardware hash is not cryptographically bound to the device. Whoever holds the hash can register a device. Device association verifies TPM-backed identity before the marker is written. Corporate identifiers are weaker still, since they are just serial numbers.
| Classic Autopilot (hash) | Corporate identifier | Device association | |
|---|---|---|---|
| Registration via reseller / OEM | Yes | No | No |
| Cryptographically bound to device | No | No | Yes, TPM attestation |
| Corporate-owned marking | Yes | Yes | Yes, automatic |
| OOBE customization | Yes | No | Yes |
| Device-targeted policy | Yes | No | Yes |
| Removal from portal | Yes | Yes | No, device-side only |
💭 Final Thoughts
Device association does not replace vendor registration. What it does is make device preparation viable for depot, staging and technician-driven rollouts, meaning anywhere someone already has the device in their hands. For direct-ship scenarios, classic Autopilot remains the only option for now.
If Microsoft ships a partner or OEM channel for the DeviceLink at some point, this assessment changes completely. Until then it is a well-built feature with a clearly bounded use case, and my honest recommendation is to match it to the deployment model you actually run rather than the one you wish you ran.
The thing that will bite people first is not the CSV export. It is the missing de-association from the portal. Everyone will remember to build the onboarding process and nobody will think about the return path until the first device goes back to the leasing company with a foreign tenant still stamped into its firmware.
Leave a Reply